HuskyVoiceAI → Slack Integration ( n8n )
This guide shows you how to send a Slack notification every time HuskyVoiceAI fires a call.completed webhook—so your team gets instant visibility into call outcomes, summaries, and recordings.
What you’ll build
HuskyVoiceAI → (call.completed webhook) → n8n → Slack channel message
Slack message will include:
Agent name, call direction, number dialed
✅
call_duration_seconds(numeric)Sentiment + interest level
AI summary + next steps
Recording link
(Optional) transcript snippet
Prerequisites
HuskyVoiceAI Webhooks enabled
n8n (cloud or self-hosted) with a publicly reachable webhook URL
Slack workspace access and permission to authorize Slack in n8n
Target Slack channel (example:
#calls)
Reliability note: HuskyVoiceAI may retry webhook deliveries. Your n8n workflow should respond fast (2xx) and optionally dedupe by
event_idto avoid duplicates.
Step 1 — Create the n8n workflow
1.1 Add a Webhook trigger node
In n8n, click New Workflow
Add node: Webhook
Configure:
HTTP Method:
POSTPath:
huskyvoice/call-eventsResponse Mode:
On Received(respond immediately)
Go back to the workflow as the data is stored automatically
n8n will show a Test URL and Production URL.
Step 2 — Connect HuskyVoiceAI → n8n webhook
In HuskyVoiceAI:
Go to Webhooks
Add a new webhook endpoint
Paste the n8n Test URL
Enable events:
✅
call.completed
Save
Now trigger a test call in HuskyVoiceAI so n8n receives the payload.
Back in n8n:
Click Execute workflow
Trigger a call
Confirm the Webhook node captures the request. Tick mark is shown.
Step 3 — Normalize the payload (Set node)
Add a Edit Fields (Set) node after the Webhook.
3.1 Configure the Set node
- Drag input fields or add field
event_id→{{$json.event_id}}event_type→{{$json.event_type}}created_at→{{$json.created_at}}
Call meta
call_id→{{$json.data.call_id}}status→{{$json.data.status}}direction→{{$json.data.call_direction}}call_to→{{$json.data.call_to}}
✅ Duration as number
duration_seconds→{{ Number($json.data.call_duration_seconds) }}
Agent
agent_name→{{$json.data.agent_name}}
Analytics (null-safe)
sentiment→{{$json.data.call_analytics?.sentiment || ""}}interest_level→{{$json.data.call_analytics?.interest_level || ""}}summary→{{$json.data.call_analytics?.summary || ""}}next_steps→{{$json.data.call_analytics?.next_steps || ""}}
Links
recording_url→{{$json.data.call_recording || ""}}
Timestamps
triggered_at→{{$json.data.call_triggered_at || ""}}completed_at→{{$json.data.completed_at || ""}}
Step 4 — Create a transcript snippet (optional but recommended)
Add a Code node (or a second Set node) after the Set node to build a short snippet for Slack.
Option A: Using a Set node (simpler)
Add field:
transcript_snippet→
{{ ($json.data.call_transcript || []).slice(0,3).map(t => `${t.speaker}: ${t.text}`).join("\n") }}
If your
Setnode already uses “Keep Only Set”, you may prefer adding this snippet in a separate node, or include it in the first Set node by referencing the original input via{{$node["Webhook"].json.data.call_transcript}}. The easiest approach is: Webhook → Set (normalize) → Set (snippet).
Recommended approach (clean & reliable)
Do this:
Webhook → Set (normalize) → Set (add transcript snippet)
In the second Set node:
Keep Only Set: false (so it keeps existing fields)
Add:
transcript_snippet→{{ ($node["Webhook"].json.data.call_transcript || []).slice(0,3).map(t =>${t.speaker}: ${t.text}).join("\n") }}
Step 5 — Send Slack notification
Add a Slack node after your last Set node.
5.1 Configure Slack node
Resource: Message
Operation: Post
Channel:
#calls(or your choice)Authorize Slack credentials if prompted
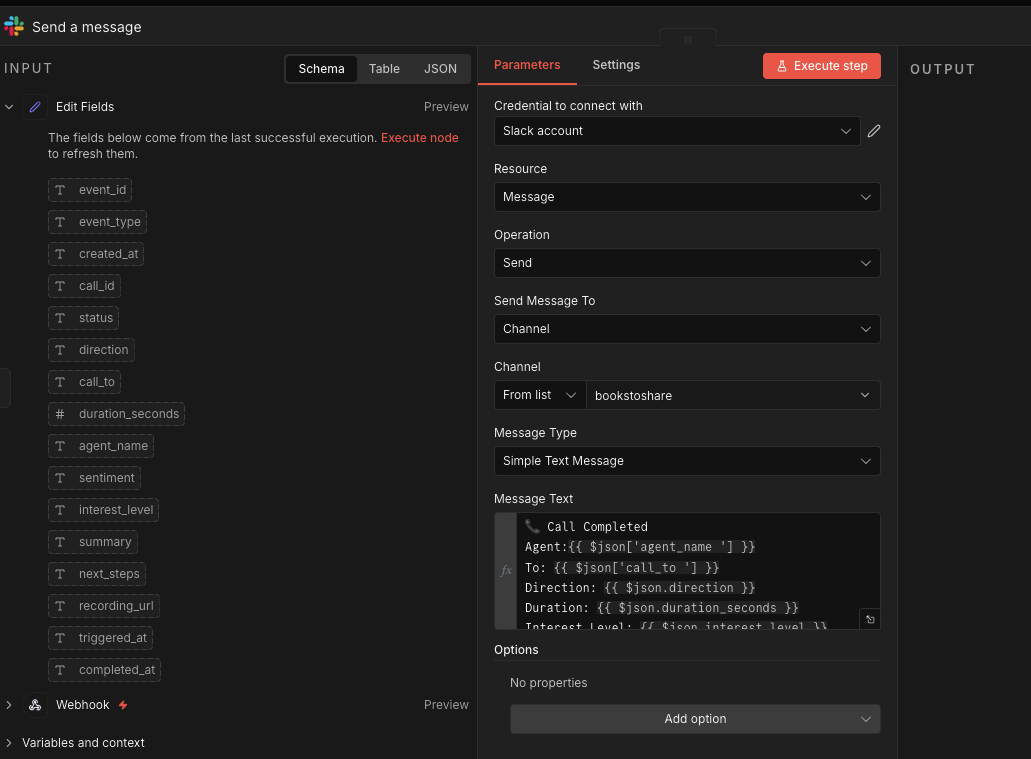
5.2 Message template (copy/paste)
Use this message body (works well in plain text Slack posts):
📞 *Call Completed* — {{$json.agent_name}}

• *To:* {{$json.call_to}}
• *Direction:* {{$json.direction}}
• *Duration:* {{$json.duration_seconds}}s
• *Interest:* {{$json.interest_level}}
• *Sentiment:* {{$json.sentiment}}

*Summary:* {{$json.summary}}
*Next Steps:* {{$json.next_steps}}

🔗 Recording: {{$json.recording_url}}

{{ $json.transcript_snippet ? `🗣 Transcript (top lines):\n${$json.transcript_snippet}` : "" }}

(Call ID: {{$json.call_id}} | Event: {{$json.event_id}})
If you don’t want transcript lines in Slack, remove the snippet section.
Step 6 — Go live (Production mode)
Once it works in test mode:
Copy n8n Production Webhook URL
Update the webhook endpoint in HuskyVoiceAI to the Production URL
- In n8n, Activate the workflow
Now Slack will notify your channel on every completed call.
Optional (Recommended): Route notifications to different channels
Add an IF node before Slack and route based on analytics.
Example rules:
Send to #sales-calls if interest is medium/high
Condition:
{{$json.interest_level}}ismedium_interestOR
{{$json.interest_level}}ishigh_interest
Send to #qa-call-review if duration is too short
Condition:
{{$json.duration_seconds}}is less than20
Then attach separate Slack nodes per channel.
Optional (Recommended): Prevent duplicate Slack messages using event_id
Because webhooks can retry, duplicates can happen if Slack temporarily fails or your workflow times out.
Simple dedupe options:
Use n8n Data Store node (if available) to store
event_idand skip if already seenUse a lightweight DB/Redis
Or (quick hack) log
event_idinto a Google Sheet and “Lookup” before posting
If you tell me what n8n version you’re on (and whether you have Data Store), I’ll give you the cleanest dedupe implementation.
Troubleshooting
Webhook triggers but Slack message doesn’t post
Check Slack credentials in n8n
Confirm the bot/app has access to the target channel
Try posting to a public channel first
Missing analytics fields
Some calls may have missing
call_analytics; our mapping is null-safe (|| "")
Duration shows wrong type
Ensure you used:
{{ Number($json.data.call_duration_seconds) }}
Duplicate Slack messages
Enable dedupe using
event_id
Related Articles
HuskyVoiceAI → Slack Integration ( Zapier )
Objective Automatically send a notification to Slack every time a HuskyVoiceAI call is completed. Workflow: HuskyVoiceAI → (call.completed webhook) → Zapier → Slack Prerequisites HuskyVoiceAI account with Webhooks enabled Zapier account Slack ...HuskyVoiceAI → Slack Integration ( Make.com )
Objective Automatically send a notification to Slack every time a HuskyVoiceAI call is completed. Workflow: HuskyVoiceAI → (call.completed webhook) → Make.com → Slack Prerequisites HuskyVoiceAI account with Webhooks enabled Make.com account (Cloud) ...HuskyVoiceAI → Google Sheets Integration ( Zapier )
Objective Automatically log every completed HuskyVoiceAI call into a Google Sheet for tracking, analytics, and reporting. Workflow: HuskyVoiceAI → (call.completed webhook) → Zapier → Google Sheets Prerequisites HuskyVoiceAI account with Webhooks ...HuskyVoiceAI → Google Sheets Integration ( n8n )
This guide shows you how to automatically write every completed HuskyVoiceAI call into a Google Sheet using n8n. You’ll end up with a clean, searchable call log that your team can filter, share, and report on. What you’ll build HuskyVoiceAI → ...HuskyVoiceAI → Google Sheets Integration ( Make.com )
Objective Automatically log every completed HuskyVoiceAI call into a Google Sheet for tracking, analytics, and reporting. Workflow: HuskyVoiceAI → (call.completed webhook) → Make.com → Google Sheets Prerequisites HuskyVoiceAI account with Webhooks ...